- Homepage (this page)
- Tech Site
- Old Funny Site
CategoriesAdsSyndicate This Blog |
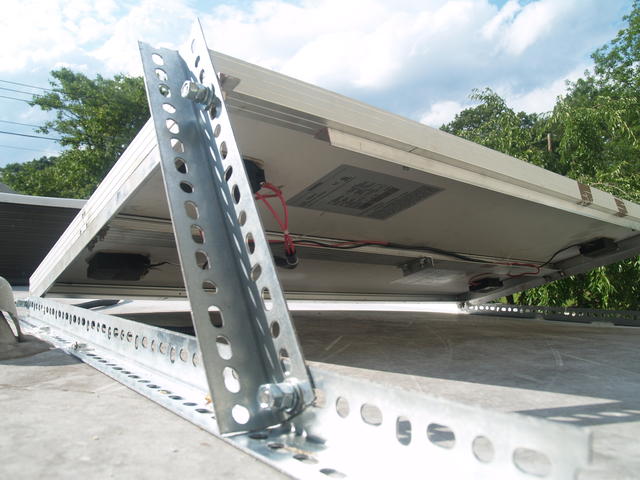
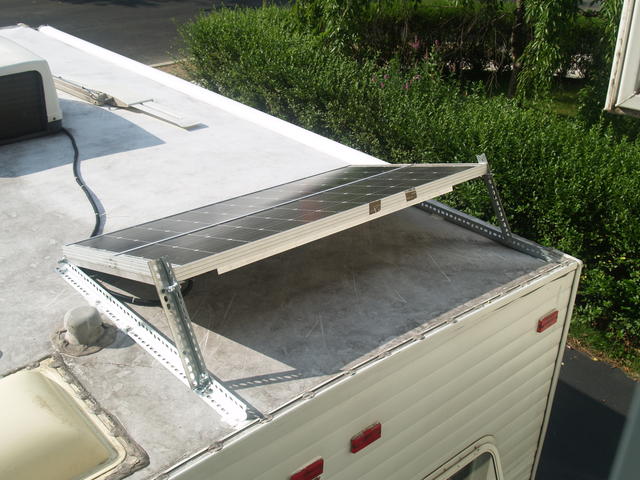
Our RV gets Solar PowerFriday, August 14. 2009 We have yet to take our first trip, but I couldn't wait. Actually I found used panels and a charge controller on Craigslist and picked them up the same day we got the trailer! Someone was selling a pair of 50 watt panels and a 15 Amp charge controller. We have yet to take our first trip, but I couldn't wait. Actually I found used panels and a charge controller on Craigslist and picked them up the same day we got the trailer! Someone was selling a pair of 50 watt panels and a 15 Amp charge controller. As it turned out, the hard part of this installation was not electrical but rather mechanical - finding beams to screw into, without perforating the rubber roof unnecessarily or causing leaks. Some details on both electrical and mechanical install: MechanicalFirst of all, I (wisely) decided to hold off on the mechanical install until I received a tube of Dicor roof sealant (caulk made by the same company that makes the rubber roof we have). There is no way I am going to cause a leak in our trailer, I've seen the irreparable damage that a leak does to one. DesignFirst I decided that I wanted my panels to have adjustable tilt. After studying this page on calculating the optimum solar panel angle I determined that for my location (New Jersey) and viscinity, I should be aiming for at least a 12 degree pitch in all seasons, and much more in spring and fall if I'm not too lazy to change it. That said, the question is... which way should they face? Meaning, which side will I try to aim at the sun (South) when I park the trailer? The left side has the fridge and should stay cool, that's not a good idea. The right side has the awning, that's probably fine but then again, sunlight will reduce the cool area under the awning. The rear has the bedroom window, which is probably OK, though I'm not crazy about hot sun heating up the bedroom all day. That leaves the front, which has a tilting window shield, and keeps our sun energy absorption footprint low to keep the RV cool. In either case, with a reasonable mount design I should be able to easily tilt the panels in the opposite direction (eg front or back). The impact of rear-facing panels on the air dynamics is another question, as is the possibility of the mounts getting ripped off the roof from the air force I checked the entire roof with a stud finder and determined (incorrectly) that I could mount the panels on the front of the RV, forward of the fridge vent. After a more careful inspection it turned out that the beams are not very cooperative and the only good location is the back, where I have enough room to mount the panels with the long side across the RV, tilting the panels forward or back. This is not ideal on my driveway (sun only hits them after noon) but home I don't need as much sun. MountsI made the mounts myself rather than buying them largely because I am saving money and I had most of the materials on hand. I first attached the two panels together with two aluminum 3/4" L brackets, which also have the main tilt-bolt holes in them. These eliminated the need to drill additional holes into the panel frames. Then I simply used some perforated steel (cheaper than aluminum) L brackets as the mounts. I flooded the area with Dicor, coated the screws, washers and even that part of the L bracket, and screwed them in. It was easy once I found the studs, except for one minor blunder - the roof wood framing is not 2x4 wood... or if it is, they are horizontal. My 2.5" lag bolts came through into the trailer. 2" or just under would have been better.  Solar Mount detail As for the pitch risers, they are the excess of the steel L's - on 5/16" bolts with counter-tight nuts and lock washers. All of this is coated with anti-seize of course. By the way, the short aluminum L that can be seen on the rear of the panel is there to relieve strain and prevent bending in the wind - that's a 48" span. I doubt that it is actually needed. Also there is a tiny 4" piece binding the two panels together mid-span, also an attempt to enhance rigidity - probably overkill. They also function as extra weight-distributing feet for the panels should they ever be allowed to lay flat on the roof - hopefully preventing damage to the rubber roof surface. ElectricalI had spools of 12AWG stranded wire around, so I ran some through split-loom conduit, snaked it down the refrigerator vent (had to remove the vent cover temporarily) and ran it to the power converter area. There I found a nice panel to mount my charge controller, and from that the power runs to the power converter's battery terminals (directly). More on aspects of this can be found in my Tech Article on this subject I did some performance testing of my 100 watt array, and with the battery removed it was able to produce steady 5A+ at 13V in good August mid-day sun at 40° lattitude, which I think is pretty good. Neither angle nor clear skies were perfect. Trackbacks
Trackback specific URI for this entry
'Coffee Bar' design by David Cummins powered by Serendipity |


